


From a young age, Katrin Hummel found herself drawn to creating art and illustrations. This passion led her to pursue a career in illustration and motion graphic design, but when she and her family lost their home in the 2022 Brisbane floods, her profession also became a way to practise mindfulness for her mental health and creative wellbeing. “I found myself needing a creative outlet that felt accessible and fun. I wanted to get back to drawing in a way that wouldn’t require a huge setup. That’s when I rediscovered brush pens,” says Katrin. “[It] became that reset button; a way to process emotions without pressure.”
If you’re looking for a creative and mindful hobby, brush pen art is the perfect place to start. Brush pens are vibrant, versatile and easy to take on the go, so you can create whenever inspiration hits. Learn everything you need to know to get started, from supplies to techniques, and create your very own artwork in this comprehensive guide to brush pen art.
How to Create A Jacaranda Tree Artwork With Brush Pens

Layer and blend colours, add texture and use different brush strokes with your brush pens to create your own jacaranda tree masterpiece with Katrin’s step-by-step guide.
What You’ll Need:
- Tombow Dual Brush Pen 108pc with Storage Case
- Born Dual-Tip Brush Markers 50 Pack Assorted
- Daler-Rowney Smooth Cartridge Pad 130gsm 30 Sheets A4
- Born 25% Cotton A4 Watercolour Pad 200gsm 12 Sheets
- Clairefontaine PaintON A4 Recycled Mixed Media Pad 30 Sheets
- Staedtler Tradition Graphite Pencil 2H
- Faber-Castell Goldfaber Graphite Pencil 2B
- Faber-Castell Kneadable Erasers Grey 2 Pack
- Clairefontaine My Essentials A5 Notebook Plain 2 Pack Brown
- Born Sketch Graphite Set 12 Piece
- Derwent Water Paintbrush 3 Pack
- Sakura Gelly Roll Pen Bold White
- Sakura Gelly Roll Gel Pen Moonlight 10 Leaf Green
- Sakura Gelly Roll Gel Pen Moonlight 10 Lavender
- Pentel Arts Aquash Water Paintbrush Assorted
- Born Taklon Paintbrush Round 6 Pack

Step 1: Before starting your artwork, take some time to practise different colour combinations and compositions with your brush pens. This will help you identify which colours offer the best contrast with each other and help you decide on the most visually appealing palette for your jacaranda illustration.

Step 2: Begin by lightly sketching an outline of the jacaranda tree with a pencil. Focus on capturing the main structure of the tree and flow of the branches, without worrying about every detail. This sketch will guide your brush pen work.
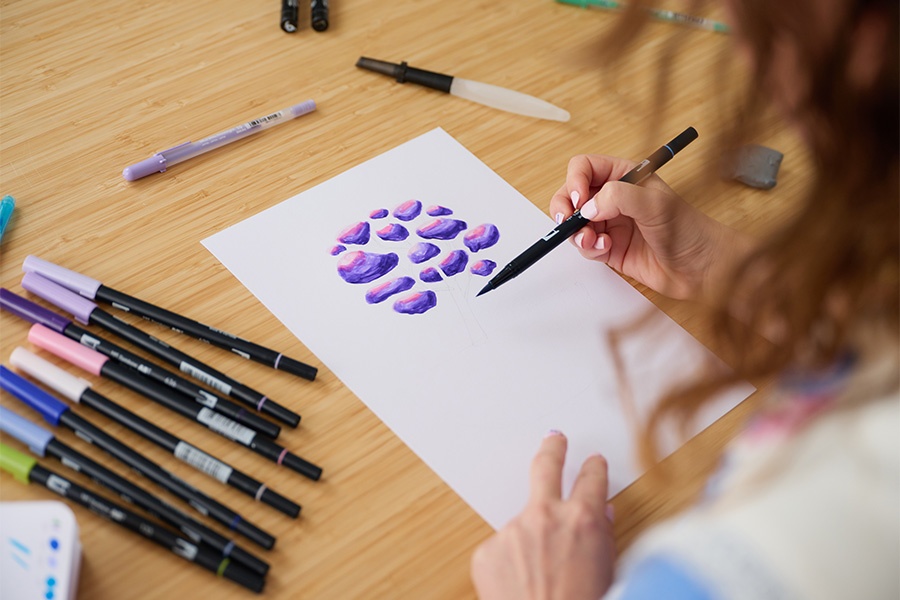
Step 3: To create those iconic blooms, start by applying the darkest shade of your chosen colour for the blossoms using flowing, circular strokes. Then, build up the highlights of the blossoms using your mid and lighter colours above the darker shades. For added depth, try layering the same colour on top of itself. Once your blooms are finished, use a water brush to blend the colours and create a gradient.

Step 4: Time to build out the tree trunk. Using a dark blue or light blue brush pen, outline the tree trunk and branches. Create fluid, organic shapes, using quick strokes to reflect the tree’s natural growth. Vary the pressure on your brush pen to create both thick and thin lines for depth.

Step 5: Now it’s time to start your grass area around the tree. For the fallen petals, draw in circular motions using the same colours as the tree blossoms. Experimenting with the different shades of purple and pink, and swapping between line work and filled circles will create more variety. Add green for the grass by using quick, flicking strokes to create fine lines and movement.

Step 6: If desired, use a gel pen or paint marker to add small details like tree bark, leaf veins or extra details in your flowers. You can also blend areas with water to soften transitions between colours. Let the artwork dry completely before proceeding.

Step 7: Once the artwork is dry, gently erase any pencil lines to clean up your work and leave it looking polished. If you’d like, give your illustration a title, add your signature and date it. This not only marks the artwork as your own, but also adds a personal touch and helps track your artistic journey as you continue to grow and create.
SEE ALSO: Celebrating the Creative Process With Mulga the Artist
Brush Pen Techniques to Practise

Katrin says making your own colour chart is a great way to become familiar with brush pens as it allows you to see the vibrancy of the colours and to better understand how your brush pens apply to paper. Follow these tips from Katrin to practise your technique, brush strokes and blending.
Dry on Dry Method (Katrin’s Favourite)

This method of using brush pens involves using the pens directly on dry paper.
Start by holding the pen at a slight angle. Apply the nib to the paper at varying pressures and practise thin and thick strokes. The more pressure you apply, the thicker the lines. Light pressure creates thin, fine lines, whereas more pressure creates thicker, bolder lines.
Hot Tip: Try using varying pressure in one stroke to see what kind of effects you can achieve.
Dry on Wet Method

This technique creates a watercolour-like effect for softer and more organic results.
Start by wetting your paper by dipping a clean paintbrush into fresh water and painting over the desired area. You can also use a spray bottle to spray water onto your page. Be careful not to saturate the paper. Immediately apply your brush pen to the wet paper and watch the colour spread and bleed throughout the water on the paper, creating a blended effect.
Hot Tip: Try this method on larger areas to create soft transitions for the background in your artwork.
SEE ALSO: My Creative Process With Jess Keeli
Flat Wash Technique

Try this technique to create softer edges or an even wash of colour to your page.
First, apply brush pen strokes on your paper. Then, use a water brush or clean paintbrush dipped in water to go over the strokes, evenly blending them into a softer colour wash known as a flat wash. The water brush will dissolve the ink, softening the lines and creating a wash of colour on your page.
Hot Tip: The flat wash technique is ideal for adding a wash of colour to large areas or backgrounds.
Gradient Wash Technique
With similar steps to the flat wash technique, this technique creates a soft gradient.
Begin by adding some colour with your brush pen. Then, use a water brush or clean paintbrush with water and ‘pull’ down the colour from the centre and blend it downwards to create a gradient.
Hot Tip: You can also use this technique to seamlessly blend multiple colours together in a gradient.
SEE ALSO: The Creative Tech These 4 Artists Swear By
Colour Blending Techniques
There are lots of different techniques to try when it comes to blending your colours. Try them all to find what works best for you.
Dry-on-Dry with Water Brush Colour Blending
This method creates a gentle gradient, beautifully merging two colours.
Create two brush pen strokes, each different colours, leaving a small white space between.
Use a water brush or clean paintbrush with water to blend the two colours together, softening the space between them.
Wet-on-Wet Colour Blending
This technique works well for creating subtle, smooth transitions between colours.
Blend two colours together by applying them over each other. Apply the first colour to your page. While the first colour is still wet, add the second colour on top of it, allowing them to mix together.
Layering Colour Technique

Practise this technique to create a sense of depth and contrast in your artwork.
Start by adding a light brush pen colour to the page. Continue adding colour on top of your brush pen strokes, layering each time with a darker colour, until you reach the desired saturation.
Hot Tip: Building from darker to lighter colours ensures smoother blending.
Fine Tip Application
Brush pens often come with dual tips – one large brush-like nib and the other a harder, small nib. To make the most of this tool’s versatility, Katrin recommends using the smaller tip to add finer details to finish off your artwork.
Holding the brush pen vertically, use the fine tip of the brush pen to add intricate details, like hatching or outlining. This is useful for areas that require precision, such as texture or small features.
